Showing posts with label Daring Bakers. Show all posts

Wednesday, January 27, 2016

THE DARING KITCHEN JANUARY, 2016 CHALLENGE: CAKE DESIGNING


Daring Bakers is evolving and now will be called The Daring Kitchen. The main change is that the challenges will extend out side the scope of baking. I am very excited about this change and look forward to lots of fun in the kitchen with my daring friends. This month, Shillpa Bhaambri from Cakeline the Journey, a Baker and Cake designer living in Mumbai, India is hosting the challenge. Her challenge is a cake design challenge. Here is the link to her challenge with lots of great ideas and recipes.

Here is the exciting part of Shillpa's challenge for me. I returned home yesterday from a course with Nicholas Lodge of International Sugar Art Collection in Atlanta GA. I took a PME certification course in Rolled Fondant Techniques. This visit was not my first to the school. I have been going every year for the last 18 years. I love the school and I always learn new techniques. I could go on and on about how wonderful the experience is there but I think you have to see for yourself. People  from all over the world come to learn from Nick and I have made some great friends at the school.

For the PME certification class, we worked with fondant, gumpaste and a combination of the two media. Having taken a lot of gumpaste classes with Nick, I have memorized his recipe. I find it very easy to make. Shillpa has the recipe in her challenge so hit that link above if you want to make it.
For fondant, I always buy it. I am not lazy...ok I am a little lazy. If I thought I could make fondant as nice as some of the commercial brands I use, then I would definitely make it. But I am loving the Renshaw brand of fondant and find it economical as well as delicious and easy to use.

Modeling chocolate aka candy clay and I have a love/hate relationship. I have moderate success in making it. I find it expensive to buy BUT when all the stars align, it is my favorite sugar medium to use. Modeling chocolate tastes like chocolate. Yum! Also, I can make decorations and not have to wait for them to dry as I would for fondant or gumpaste. Once they cool they are ready. Great news for the last minute, sort of lazy decorator that I am from time to time.

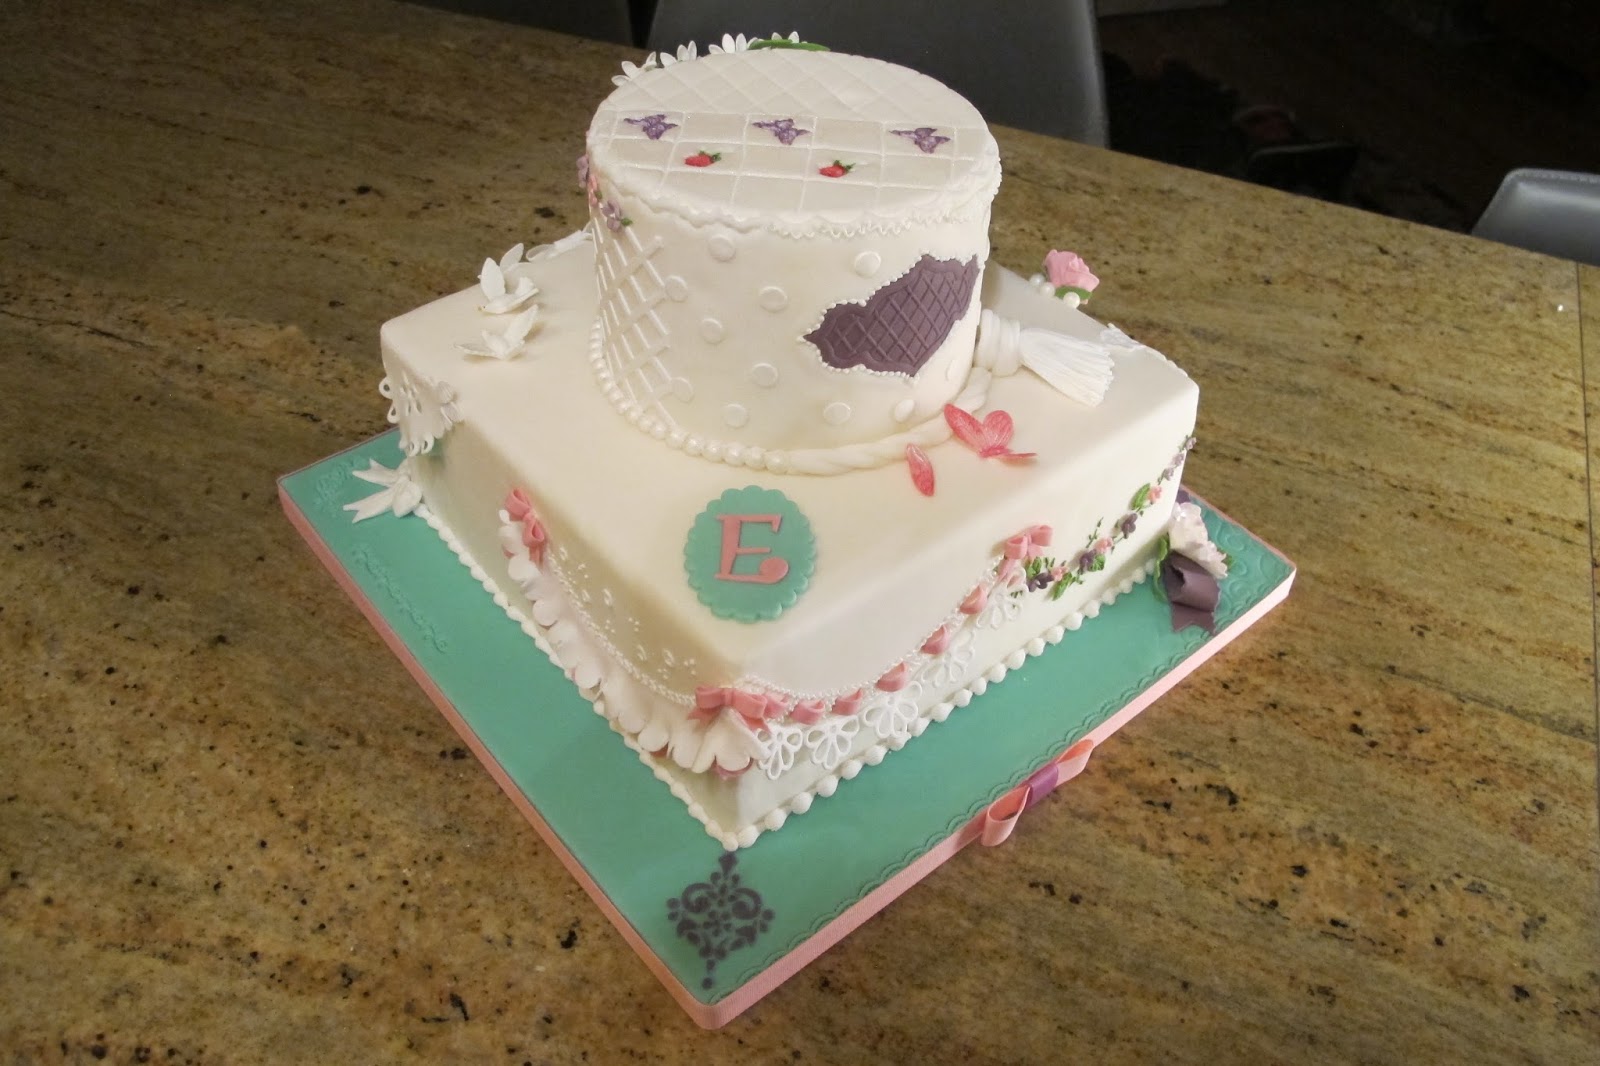
For this blog, I will talk about the cake that I did in class last week. The cake is a dummy cake which means that the parts that looks like cake are Styrofoam. I can keep this forever or until I turn my back and someone pokes on it breaking the decorations. Speaking of which, I would like to send nasty glares to the Atlanta TSA who somehow managed to start my cake, in its box, right side up through the scanner and return it to me upside down. There was minimal damage, thankfully, due to the fantastic packing job at I.S.A.C.
Below are some pictures the cake project. Hopefully, I will meet some of you in class someday. I am already saving my money for the next visit.


Gumpaste decorations drying in foam

As a sampler cake, we did many designs all over the cake.

Lovebirds?

Two kinds of draping- above and below


His talent is amazing. His generosity and kindness is  fantastic!

Friday, November 27, 2015

THE DARING BAKERS’ NOVEMBER, 2015 CHALLENGE: CHEESE CAKE CRUMBLE PIE


Today is the day after Thanksgiving. While I love Thanksgiving  with the gathering of friends sharing lots of food and fun, my most thankful feeling is that it is over. I cook too much. I eat too much and I make a monumental mess. The mess is not limited to the kitchen where thankfully my dear friends help straighten my mess. I will be sorting through piles of  mess throughout the house for a week.

Today is also Black Friday where everyone goes shopping and stands in line to save a penny. Not me!  I am waiting for Cyber Monday although I think Cyber Monday actually started last Thursday and Black Friday started last August. I find it hard to keep up as every business seems to have its particular spin on the dates and deals.
So what has this got to do with this month's challenge?? Umm nothing really, I am just ranting.

For the month of November Krista & Nicole of “Two Cups of Sugar.”challenged us to make our own version of cheesecake crumble pie.
This month's challenges was very interesting to me and I made the pie  early in the month. I did not make it for Thanksgiving because I experimented a bit, as challenged by Krista and Nicole, and found a cheesecake pie that worked a little better for me .


Here is the link to their challenge. The last recipe in the challenge, BLT cheesecake Pie,  is now on my bucket list.  I need to recover from cream cheese overload for a little while before I tackle the recipe so I am keeping the recipe on file for the rapturous time when tomatoes are in season here again.
Making the cheesecake pies is fairly easy. I used my usual pie crust recipe which works well for me.


Add caption


The filling recipe is really nice and there were no unsightly lumps of cream cheese floating in the batter. Yes, that sort of thing happens if I do not coddle and hover over my cheesecake batter.


 I used raspberries and blackberries and they seemed most appropriate for a crumble pie which is typically very sweet. The lemon zest in the recipe also blended nicely with the fruit. The recipe for the topping made a lot and seemed drier than the the challenge picture. I covered the pie as much as I thought useful and
kept the rest for another project. It should freeze well.

The pie came out really nice. The baking method is to start with a high heat, reduce the heat after 10 minutes and baking for an hour. Then, turn the heat off and  leave in the oven with the door ajar. for 30 minutes.


 I think that I should have turned the heat off in the oven  sooner. I think a little less cooking would have given creamier filling results though the longer cooking time created a nice pie crust and a lovely golden topping. The taste was sweet, fruity and very rich. Small slices of pie  are manageable which is great is you are serving a crowd.

The second pie recipe is Pecan Cheesecake Pie that I got from a Southern Living magazine and combines my two favorite desserts, pecan pie and cheesecake. There is a layer of cheesecake and a layer of pecan pie that magically transforms into a plate of pure joy. This pie has a couple of separate elements that at first sight might seem cumbersome but whip together easily.  I did serve this pie(along with a lot of other desserts) for Thanksgiving. This is one recipe I will make again next year.
When making the Pecan Cheesecake Pie, be sure to use a deep dish pie pan or else there won't be enough room for both fillings. I made that mistake on my first try with the pie. If you don't have a deep dish pan, then I recommend that you use all the cream cheese mixture, top with the pecans and  fill to the top with the corn/syrup egg mixture. You will have some leftover corn syrup/egg mixture but the pie will still be really good. I believe this is best served slightly chilled so I advise removing the pie from the fridge about an hour before serving. Unlike most cheesecakey desserts, this pie will keep well in the fridge for a few days or until you have sneaked enough "slivers" while cleaning up the Thanksgiving mess. Not that I would know anything about that!
Pecan cheesecake pie is top picture and  top dessert dog over red velvet cupcakes and apple pie!

Sunday, September 27, 2015

THE DARING BAKERS’ SEPTEMBER, 2015 CHALLENGE: IRISH SODA BREAD


For the month of September Meredith from the Poco Loco Olsons challenged us to experiment with soda bread. Here is the link to the Daring Bakers Challenge as presented to us. I am so excited to share this recipe with you as a truly quick bread that is delicious.

There is a lot of history to Irish Soda bread which was not, according to many sources, developed by the Irish. Here is a link to The Society for the Preservation of Irish Soda Bread. It gives a good reading on the history of soda bread.

Here is a link to a site that is called European Cuisines and discusses Soda Bread. I found it very informative about the European take on Soda Bread.

There are many variations on soda bread and the ones considered true soda breads are quite plain. The dough rises through a chemical reaction between the soda and buttermilk. Adding dried fruit or orange zest or nuts does make a tasty bread but these are considered tea breads, not soda breads.

The bread is crazy easy to put together. Irish soda bread is a good one to teach children for a first baking experience. The hardest part is waiting for it to cook as the bread needs about 45 minutes to an hour. I am happy to report that eating a slice as soon as it is cool enough to handle is a delightful reward for patience.
 I was amazed how delicious the bread was because I was a big skeptic.. I thought it would be really dense and heavy tasting. Instead the bread was light, bright tasting and very tender. Having some sharp cheddar cheese and a dab of orange marmalade made my afternoon tea a real pleasure.
The bread does not keep though and after a day, its fate was croutons which I tossed in olive oil and lots of herbs so it tasted completely different.

Having great success with Meredith's recipe, I thought I would experiment with others to get some perspective. I found a web site that was so interesting,I bookmarked it. It is the  called Bord Bia-Irish Food Board and they had a recipe for Brown Soda Bread that I just had to try. The bread tasted very different than Meredith's recipe. It was a bit heavier and rich tasting with a hint of sweetness from the honey. I am thinking some rum soaked raisins mixed into the batter would put it over the top for taste and make a wonderful morning toast. I put some local jelly on it, Dalby Farms Strawberry Butter. It is really a jelly, not a butter but it was so smooth and creamy tasting with a powerful strawberry flavor, that the mouthfeel was definitely butter.

I am keeping Meredith's recipe handy. I love fresh bread with dinner, especially stews. As Autumns is giving us cooler evenings, I am looking forward to whipping up a loaf of this bread to get those delicious broth from a hearty vegetable soup.


Irish Soda Bread (I halved this recipe to make a smaller loaf)

Ingredients:


  •  2½ cups (625 ml) sour milk or buttermilk
  • 2 cups (500 ml) (300 gm) (10½ oz) whole wheat four (see note above on how to measure flour) 
  •  4 cups (1000 ml) (600 gm) (21 oz) all-purpose (plain) flour (see note above on how to measure flour) 
  • 2 teaspoons (10 ml) (10 gm) baking soda 
  •  1 teaspoon (6 gm) salt

Directions:
 1. Preheat oven to hot 450°F/ 230°C/gas mark 8 and line a baking sheet with parchment paper.
 2. Mix the dry ingredients in a medium-sized bowl. (I do this by hand, but you could use a mixer if you’d prefer.)
3. Make a well in the middle of the dry ingredients.
4. Pour the sour milk/buttermilk into the well.
5.Mix the dough until the flour is completely incorporated. (It will be very stiff. I find it helpful to knead the dough by hand a few times while it is still in the bowl to make sure all of the flour is incorporated before moving on to the next step.)
6.Transfer the dough to the prepared baking sheet.
7. Pat or roll the dough into a circle shape that is approximately 1 inch (2½ cm) thick.
Using your fingertips or the blunt end of a wooden spoon handle, make several dimples in the top of the dough. (This is very similar to the technique used when making focaccia bread.)

8. Place the baking sheet on the middle rack of the preheated hot oven and bake for 30 minutes.
 9. Reduce the heat to moderately hot 400°F/200°C/gas mark 6. Pull the baking sheet out from under the dough, so the parchment is directly on the oven rack. Bake for 10 more minutes or until the top is golden brown.


 Traditional Brown Soda Bread


  • 250g whole wheat flour
  • 200g all purpose flour
  • 1 teaspoon baking soda
  • 1 teaspoon salt
  • 1 egg
  • 350 ml buttermilk
  • 1 teaspoon honey
  • Optional Topping: 1 tablespoon sesame seeds or pinhead oats
Directions:
Preheat the oven to gas mark 6. 200 degrees C(400F)
Mix the flour, baking soda and salt in a bowl. combine the egg with the buttermilk and honey, then mix into the flour. Add more buttermilk if the batter seems dry-it should be a soft dough. Put the dough in a lightly oiled bread pan. Sprinkle with the sesame seeds or oats, if using.
Bake for 45 minutes to an hour- it will sound hollow when it is fully cooked.( Evelyn's tip: use an instant read thermometer to determine doneness and the temp. should be around 200 degrees F.)Remove from the pan and wrap the bread in a clean dish towel to keep the crust soft. I did not do this step because I like the slight crunchiness of the exterior.


Monday, July 27, 2015

THE DARING BAKERS’ JULY, 2015 CHALLENGE: YAFAWI SFEEHA


The July Daring Bakers’ Challenge was brought to us by Manal from Manal’s Bites. She introduced us to an authentic Palestinian dish from Java that is served as a main meal along with a bowl of soup or a salad. The “Yafawi Sfeeha” or also known as “Milwayeh” which means twisted, is crispy yet tender and full of flavor.Click here for the link to the background information and original recipes from the challenge.

I was nervous about this challenge and especially nervous about getting the shape done. The dough seemed very thin and I saw disaster in my kitchen looming. So, I did a bit of research to see if perhaps there was another acceptable shape that I could manage. I was surprised and happy to see that one of our own in Daring Bakers, The Food Doctor, had blogged about meat pies and had a nice(easy) shape to mimic. So, I am admitting that this may not be a true Yawafi Sfeeha but it is a Sfeeha and it is a fun way to spend a lazy Sunday afternoon.

The Sfeeha look impressive and made the house smell divine. My hubby kept lurking about waiting for me to turn my back so he could  taste test. He loved them but he likes a sauce with most everything and I knew he would want one with these. They don't need them but he was dipping away and said they were really good. I used a Peanut Coconut Sauce from Whole Foods. I put a link on the name to Amazon in case you do not have a Whole Foods nearby but want to try it. Here is a picture of the sauce.
Now back to the Sfeeha. I want to give a suggestion about the baking. Because the Sfeeha bake at a very high temperature, I used two baking pans nested to help insulate. This proved to be a vital step. When I removed the Sfeeha from the oven, two of them were not yet golden brown on the bottom(they were the first two I shaped also) so I removed the others and put the two back in the oven for a few more minutes. When I put them in though, I did not double pan them as I did initially. Within a minute, my oven was smoking. I took them out and they were burned, the parchment paper was burned and here is what they looked like. The underside was black.
No Good :(
But let's talk about the other successful eight! The pastry was crispy outside and cloud like tender inside. The meat was juicy and flavorful, the spices worked well together not overpowering each other or the dish. I served them with braised broccoli rabe and Russian kale but I think a fresh cold salad would have been a better choice. 
All in all, I think these will make a nice pot luck and I plan to bring some to the next book club meeting. They will travel well and don't really need a knife and fork.
Manal has some great versions that are sweet as well. Perhaps you are braver than I am and will give them a try.
Below is the recipe for Sfeeha that I made:

SFEEHA

Ingredients
Dough
2  to 2 1/2 cups flour
1 teaspoon yeast
1/2 teaspoon salt
1/2 teaspoon sugar
3 tablespoons olive oil
3/4 cup water
Filling
1 pound ground beef
1 medium onion, chopped fine
2 tablespoons olive oil
1/2 teaspoon allspice
1/4 teaspoon cardamom
1/4 teaspoon ground cinnamon
1 tablespoon tahini
1 tablespoon sour cream, or Labana
1 tablespoon pomegranate molasses
salt, to taste
1 1/2 teaspoons dried mint flakes

Procedure


    Dough:

    
Proof the yeast by mixing the yeast, sugar and warm water and allowing it to sit for about 5 to 10 minutes until the mixture starts to bubble and foam. 


In a bowl, whisk together the flour and salt. Add the oil and rub the mixture with your fingers to make a coarse looking meal.


Add the water/yeast mixture and knead the dough until it forms a smooth soft dough that does not stick to your hands.


 Lightly coat a clean bowl large enough to allow the dough to expand and put the dough in it. Cover with a towel and allow the dough to double in size. At my house, in 72 degree Fahrenheit, it took a little over an hour. The warmer the room the faster the dough will rise. 


Punch down the dough and cut into 10 balls. Cover them with a towel and allow to rest for about 10 minutes.


Filling:


In a large saute pan over medium heat, saute the onions in the 2 
tablespoons olive oil until translucent, about 5 minutes.


Add the ground beef and spices and continue to cook, stirring constantly, until the beef is browned. Turn off the heat.


Add the molasses, tahini, sour cream or labaneh and mint. Mix well.


Grease your baking sheets or line with parchment paper. Place the oven rack in the center of the oven. Heat the oven to 500 degrees Fahrenheit. The recommended temperature was 270 degrees Celsius(518 degrees F.) but I was uncomfortable cooking higher than 500.  I also double panned my baking sheets for extra insulation.


Roll the dough into a small(I did a 4-inch) circle. Place the filling in the center. Wet your fingers and pinch two sides of the dough circle with your index finger and thumb. Repeat on the other side so that you have four corners
Transfer to the prepared baking sheet and allow to rest 10 minutes.
I you are making a large amount of meat pies, cover the pies with a cloth while they are resting to prevent the surface from drying which will result in cracked surfaces at baking.
Just before baking, re-pinch the corners to , making sure they are sealed tightly. Brush the pastry surface with an egg wash optionally. I mixed an egg with 1/4 cup milk and brushed the pastry using a pastry brush.


Bake the pies for about 10 minutes or until the underside is golden. If they are golden on the bottom but not on top, you can put them under the broiler to brown the tops. i did not have to do this and the egg wash helped promote browning. Transfer to a wire rack and cool slightly. These are delicious warm.


Wednesday, May 27, 2015

THE DARING BAKERS’ MAY, 2015 CHALLENGE: LAMINGTONS


For the May challenge Marcellina from Marcellina in Cucina dared us to make Lamingtons. An Australian delicacy that is as tasty as it is elegant.

I knew this was going to get messy but I am not afraid of a mess, especially a chocolate one. There was a  rumor that went around the catering kitchen I worked in many years ago that when Evelyn worked with chocolate , everyone wore chocolate home that day. The rumor was started by my beloved co-worker and I do believe that there was a lot of truth to it. So, I waited for a day when I could leisurely make a mess and then just as leisurely clean it up. I recommend this tactic when you decide to make Lamingtons. 

I have attached the PDF for the challenge here in case you want the full scoop about the history and assorted recipes/ troubleshooting for the Lamingtons.

I veered away from the recipes a bit. I made a coffee raspberry butter cake as my cake base. You can get that recipe here and to that recipe add 1 tablespoon espresso powder to the milk and 1/2 teaspoon raspberry extract along with the vanilla extract. Also, as an aside, you can tinker different flavoring with the base recipe quite a bit; it is very forgiving.

One other difference was that I rolled some of the Lamingtons in crushed chocolate cookie crumbs. I was not convinced that the coconut would be well received. I was wrong. The coconut versions were adored and devoured.  They were also the prettiest so I am sure I will stay classic with the coconut in future baking.

Here are a few of my own troubleshooting recommendations(lessons learned the hard way):
1. Make sure the cake is a day old. Freshly baked cake will fall apart during the chocolate dipping phase.
2. Don't skimp on the chocolate! Also, I added a bit of safflower oil to the chocolate to thin it a bit. I cannot give an amount as it depends on the brand chocolate and how old it is. I can tell you that for one pound of Ghiradelli morsels, I used 2 tablespoons oil. I advise adding a tablespoon at a time until you get your desired consistency. And what is that?? I like the consistency where it drops evenly and quickly from a fork but leave a thin coating on that fork. 
3. Use a cake rack and put parchment paper or wax paper underneath it to catch the drippings. That way you can reuse the chocolate. I dipped the Lamingtons and then let them sit on the rack for a few minutes before tossing in the coconut. This reduced the globbing of chocolate in the coconut for me. After dipping about 10 Lamingtons, the first ones were ready for coconut coating. 
4. Make sure you have a crowd waiting for these. There will be a lot of them. I cut my cake into  approximately 1 1/2 inch squares and I practically fed the neighborhood. Here are a few photos to get you excited or if you are a neat freak, send you running and screaming. I hope you get excited.