
Korena of Korena in the Kitchen was our May Daring Bakers’ host and she delighted us with this beautiful Swedish Prinsesstårta!
Sometimes when we get a challenge, I immediately start thinking of ways to change it and make it unique. I made all kinds of plans for this one, especially after reading a bit of history about it. Korena gave us some nice background information which I will share.
A little research revealed that the original recipe was created in the 1930s by a Swedish home economics teacher named Jenny Åkerström, who taught the three Swedish princesses of the time. She published a series of four cookbooks called “The Princess Cookbooks” and in one of the editions, there was a recipe for “Grön Tårta” (green cake). One story is that this later became known as “princess cake” (prinsesstårta) because the three princesses are said to have loved it so much. Another story is that Ms. Åkerström actually created three very elaborate “princess cake” recipes – a different one for each princess – and that the current version is a simplified combination of all three. That explains the princess connection, but the reason for the cake being green still seems to be a mystery. Today, prinsesstårta is popular in Finland as well as Sweden – so much so that the third week in September is officially Prinsesstårta Week!
I have a beautiful book called A World of Cakes by Krystina Castella in which Prinsesstårta is featured. She writes that , in Sweden, you can find the Prinsesstårta everywhere, in every variation and for every holiday:birthdays, anniversaries, national holidays, and more.
The Prinsesstårta is commonly made with sponge cake, apricot preserves, pastry cream and whipped cream. It is usually covered in marzipan that has been colored green for reasons that are not verified.
The results are "over the top" delicious and I can see why this is a celebratory dessert.It is very rich tasting, looks beautiful on the plate and gives a festive feel to the occasion of eating it. I can just imagine the nostalgic, homey feel it gives those who grew up with birthdays celebrated with a Prinsesstårta
So, create an occasion to makePrinsesstårta and find a group of people too share this wonderful traditional treat of a dessert.
Start by making the components. You can make the pastry cream and cake the day before to ease the workload.
I decided to make my Prinsesstårta with devils food cake and raspberry preserves as my variations. I love my Devils food cake recipe and look for any opportunity to make it.The cake is soft and moist and not too sweet, perfect with almost any type of icing. I covered the cake with rolled fondant mixed with pink modeling chocolate. I find that modeling chocolate gives fondant a nice sheen and wonderful taste. You can use rolled fondant, or modeling chocolate or the traditional marzipan instead..
Korena gave us some wonderful recipes for guidance. I have a pastry cream that I have used for years. It makes a lot of pastry cream but a friend of mine was making Boston Cream pie and promised to take the extra pastry cream.
Here are the recipes with pictures.

Pastry Cream
Ingredients:
6 large egg yolks
¾ cup (170 gr.) sugar
1/3 cup (75.6 grams)cornstarch
2 cup (480 ml)milk
½ vanilla bean


Procedure:
Split the vanilla bean lengthwise and add to the milk.
Heat the milk gently to scalding.
Remove the vanilla bean and scrape the seeds into
the milk mixture using a knife or small metal spatula.
Stir the egg yolks with the sugar and cornstarch.
Add the milk, a few drops at first to temper and
then the rest.
Return the mixture to the heat (medium) and cook,
stirring continuously with a wire whip until the
mixture bubbles for about 10 seconds.
Strain into another container through a fine mesh
strainer. I like to use a ladle to swirl around the strainer to push the pastry cream though easily.
Cover with plastic wrap flush against the pastry
cream and chill.
Devils Food Cake: (Sorry I do not have the conversions)
Ingredients:
2 Cups All-purpose Flour
3/4 Teaspoon Baking Powder
1 1/2 Teaspoons Baking Soda
3/4 Teaspoon Salt
12 Tablespoons Unsalted Butter, room temperature
2 Cups Sugar
3/4 Cup Cocoa Powder, non alkalized
2 Teaspoons Vanilla Extract
3 Large Eggs
1 1/4 Cups Water
1/4 Cup Milk
Procedure:
Ingredients:
2 Cups All-purpose Flour
3/4 Teaspoon Baking Powder
1 1/2 Teaspoons Baking Soda
3/4 Teaspoon Salt
12 Tablespoons Unsalted Butter, room temperature
2 Cups Sugar
3/4 Cup Cocoa Powder, non alkalized
2 Teaspoons Vanilla Extract
3 Large Eggs
1 1/4 Cups Water
1/4 Cup Milk
Procedure:
Preheat oven to 350 degrees. Grease 9 -inch spring form pan and line the bottom with parchment paper. Cover the outside of the pan with aluminium foil to catch any seepage.
2. Sift together the flour, baking soda, baking powder and salt. Set aside,
3. In a mixer fitted with the paddle, cream butter adding sugar slowly continuing to beat for about 4 minutes. Turn off mixer and scrape down sides.
4. Add the cocoa powder and the vanilla and beat at low speed until smooth.
5. Add the eggs one at a time beating well in between on medium speed and scraping the sides constantly.
6. Combine the milk and water in a saucepan and bring just to a boil.
7. Add the flour a 1/4 cup at a time on low speed. Add hot milk mixture slowly in a stream alternately with the flour beginning and ending with the flour and mix until smooth.
8.Bake for about 40 to 45 minutes or until toothpick comes out clean. Cool on a rack for about 10 minutes, remove outside ring and cool to room temperature.

Prinsesstårta Assembly
I am including a diagram that Korena gave us. It is very helpful in assembly.

Ingredients

Prinsesstårta Assembly
I am including a diagram that Korena gave us. It is very helpful in assembly.
Ingredients
2 cups (480 ml) heavy cream, chilled
granulated white sugar, to taste used 2 tablespoons because the devils food cake is not super sweet
Cake, cooled
1/3 cup (80 ml) seedless raspberry jam
Vanilla Custard, chilled
Covering and Rose
Directions:
granulated white sugar, to taste used 2 tablespoons because the devils food cake is not super sweet
Cake, cooled
1/3 cup (80 ml) seedless raspberry jam
Vanilla Custard, chilled
Covering and Rose
Directions:
1. In a large bowl, whip the heavy cream until soft peaks form. Add sugar to taste and continue whipping the cream until stiff. You want it to be sturdy enough to provide structure to the cake, but not over-whipped enough to make butter. Set the whipped cream aside.
2. With a long serrated knife, slice the sponge cake into three even layers. I used a cake leveler that I got from Wilton as shown in picture. Set aside the middle layer – this will become the top layer of the assembled cake as it is the most flexible and therefore easiest to bend into a dome over the whipped cream.


3. Place one of remaining layers on a cake board or serving platter and spread it evenly with the raspberry jam. Spread or pipe one cup of the chilled custard over the jam in an even layer, leaving enough room around the edges so that it doesn’t spill over the sides of the cake.
4. Top the custard with another layer of cake. Spread with one cup of the custard evenly over it, again leaving some room around the edges.


5. Reserve ½ cup (120 ml) of the stiffly whipped cream. Pile the rest into a mound on top of the custard. Spread it into a thick layer with a thin, flexible spatula or off-set spatula, then hold the spatula at an angle to shape the whipped cream into a dome, piling it up in the middle of the cake as much as possible.
6. Place the final layer of sponge cake (the one cut from the middle of the cake) on top of the whipped cream. Do not press on the top of the cake – instead, gently tuck the edges of the cake layer into the whipped cream, so that they are flush with the cream. This will create a smooth, seamless dome on top of the cake.
7. Gently spread the reserved ½ cup (120 ml) of whipped cream over the entire cake to fill in any cracks and even out the surface. If necessary, refrigerate the cake to firm it up before continuing.
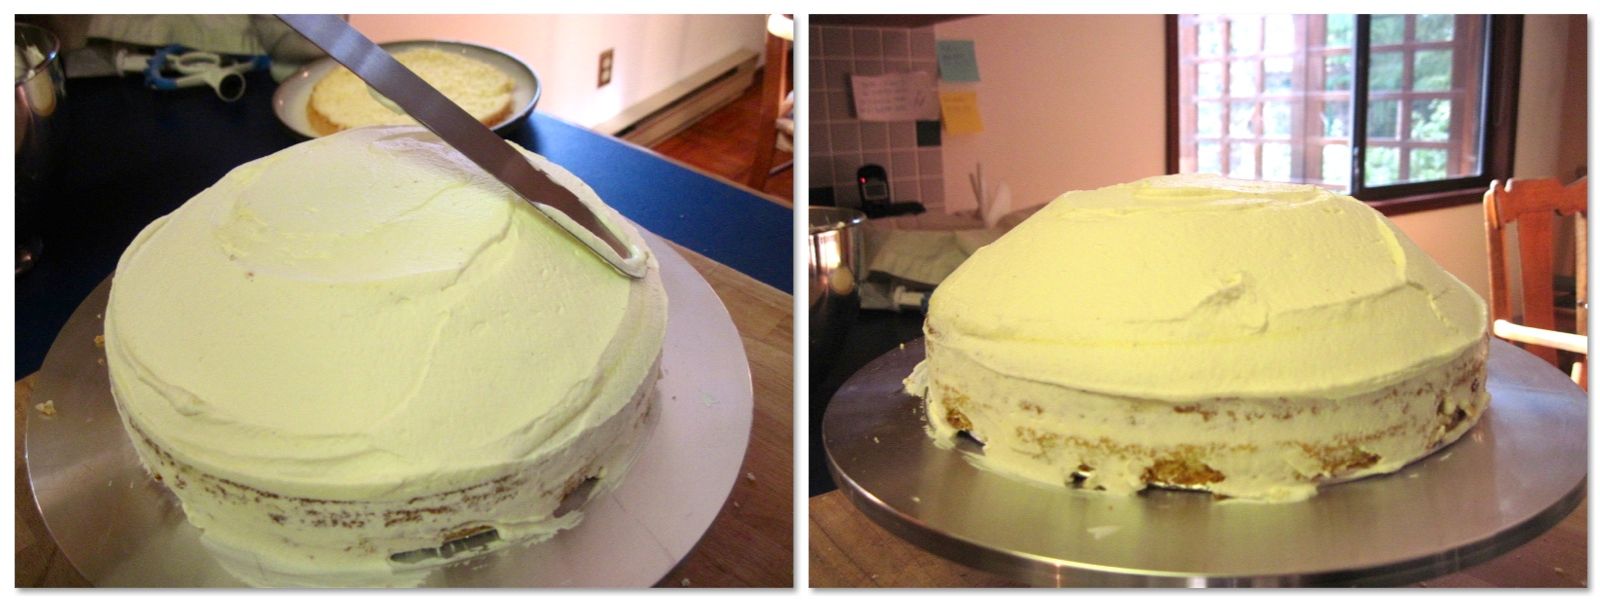
I got very nervous at this point as the cake was wobbly form all the creamy parts and I chilled it, rolled out the fondant and covered it without taking a picture. I am showing Korena's wonderful picture here so you can see what it should look like at this point.
8. Dust your work surface with icing (confectioners) sugar and press the marzipan or other covering into a 6-inch (15 cm) disc (knead it a bit to warm it up first). Coat both sides with icing sugar and roll it out into a 14” (35½ cm) diameter circle less than 1/8” (3 mm) thick. Use plenty of icing sugar to prevent it from sticking. Alternatively, you can roll the marzipan out between two wide sheets of parchment paper (still use plenty of icing sugar).
9. Use the rolling pin to drape the rolled-out marzipan sheet over the cake and smooth it around the cake gently with your hands.
If it seems like it wants to fold or buckle around the cake, gently lift and stretch it away from the cake with one hand while smoothing it down with the other.
Trim the excess from the bottom of the cake with a paring knife or spatula blade.
These were great instructions from Korena and can be used for modeling chocolate or fondant.

I decorated the top of the cake with a rose and leaves done in modeling chocolate. I covered the bottom with a border of green modeling chocolate and used a modeling tool to press a pretty design.
I will post a tutorial about the rose in my next post!
The rose is a traditional garnish and looks very pretty.
Thanks Korena! This challenge was a lot of fun and deeelish!
 |
| Korena's beautiful cake covered with domed whipped cream |
8. Dust your work surface with icing (confectioners) sugar and press the marzipan or other covering into a 6-inch (15 cm) disc (knead it a bit to warm it up first). Coat both sides with icing sugar and roll it out into a 14” (35½ cm) diameter circle less than 1/8” (3 mm) thick. Use plenty of icing sugar to prevent it from sticking. Alternatively, you can roll the marzipan out between two wide sheets of parchment paper (still use plenty of icing sugar).
9. Use the rolling pin to drape the rolled-out marzipan sheet over the cake and smooth it around the cake gently with your hands.
If it seems like it wants to fold or buckle around the cake, gently lift and stretch it away from the cake with one hand while smoothing it down with the other.
Trim the excess from the bottom of the cake with a paring knife or spatula blade.
These were great instructions from Korena and can be used for modeling chocolate or fondant.

I decorated the top of the cake with a rose and leaves done in modeling chocolate. I covered the bottom with a border of green modeling chocolate and used a modeling tool to press a pretty design.
I will post a tutorial about the rose in my next post!
The rose is a traditional garnish and looks very pretty.
Thanks Korena! This challenge was a lot of fun and deeelish!
 |
| My slice !! And now off to the gym for some calorie burning!! |

That rose and leaves...WOW! I have to try modeling chocolate. Not to mention how pretty and neat is the cake in overall. Beautiful!
ReplyDeletewoooooooow.. love it with the chocolate sponge cake!
ReplyDeleteHubby wants I make another one, so I thing I will give a try to your recipe
Oh wow! So pretty! Looks delicious too!
ReplyDeleteFantastic job! I bet this was delicious with devil's food cake! :) And perfect job with your modeling chocolate! :)
ReplyDeletePretty cake! I made my sponge into a chocolate cake but the chocolate flavor was not as strong as I'd have liked. I bet your devil's food cake tasted better! Your rose looks beautiful too.
ReplyDeleteI adore your pristine white Prinsesstarta with its gorgeous delicate rose. And you can never have enough pastry cream as far as I am concerned.
ReplyDeleteI love your variation on the Prinsesstarta! Devils Food cake sounds (and looks!) heavenly! And your rose - WOW - it's a piece of art on top of that delicious cake. Beautiful.
ReplyDeleteFantastic variation - you can't go wrong with chocolate and raspberry. Beautiful decoration too - I love the rose! Thanks for baking with me this month :)
ReplyDeleteLooks great
ReplyDeleteLove this chocolate version! The rose is just so pretty as well.
ReplyDeleteI made a chocolate version too, your layers are so neat.
ReplyDeleteYou're cake is beautiful, and chocolate is always a winner in my book! Congrats!
ReplyDeleteA chocolate version is on my list! Sounds yummy and looks so lovely! A great job on the challenge!
ReplyDeleteA princess cake with chocolate sounds great!
ReplyDelete