Monday, May 27, 2013

May 2013 Daring Bakers' Challenge - Prinsesstårta


Korena of Korena in the Kitchen was our May Daring Bakers’ host and she delighted us with this beautiful Swedish Prinsesstårta!

Sometimes when we get a challenge, I immediately start thinking of ways to change it and make it unique. I made all kinds of plans for this one, especially after reading a bit of history about it. Korena gave us some nice background information which I will share.

A little research revealed that the original recipe was created in the 1930s by a Swedish home economics teacher named Jenny Åkerström, who taught the three Swedish princesses of the time. She published a series of four cookbooks called “The Princess Cookbooks” and in one of the editions, there was a recipe for “Grön Tårta” (green cake). One story is that this later became known as “princess cake” (prinsesstårta) because the three princesses are said to have loved it so much. Another story is that Ms. Åkerström actually created three very elaborate “princess cake” recipes – a different one for each princess – and that the current version is a simplified combination of all three. That explains the princess connection, but the reason for the cake being green still seems to be a mystery. Today, prinsesstårta is popular in Finland as well as Sweden – so much so that the third week in September is officially Prinsesstårta Week!

I have a beautiful book called A World of Cakes by Krystina Castella in which Prinsesstårta is featured. She writes that , in Sweden, you can find the Prinsesstårta everywhere, in every variation and for every holiday:birthdays, anniversaries, national holidays, and more.
The Prinsesstårta is commonly made with sponge cake, apricot preserves, pastry cream and whipped cream. It is usually covered in marzipan that has been colored green for reasons that are not verified.

The results are "over the top" delicious and I can see why this is a celebratory dessert.It is very rich tasting, looks beautiful on the plate and gives a festive feel to the occasion of eating it.  I can just imagine the nostalgic, homey feel it gives those who grew up with birthdays celebrated with a Prinsesstårta
So, create an occasion to makePrinsesstårta and find a group of people too share this wonderful traditional treat of a dessert. 

Start by making the components. You can make the pastry cream and cake the day before to ease the workload.

I decided to make my Prinsesstårta with devils food cake and raspberry preserves as my variations. I love my Devils food cake recipe and look for any opportunity to make it.The cake is soft and moist and not too sweet, perfect with almost any type of icing. I covered the cake with rolled fondant mixed with pink modeling chocolate. I find that modeling chocolate gives fondant a nice sheen and wonderful taste. You can use rolled fondant, or modeling chocolate or the traditional marzipan instead.. 
Korena gave us some wonderful recipes for guidance. I have a pastry cream that I have used for years. It makes a lot of pastry cream but a friend of mine was making Boston Cream pie and promised to take the extra pastry cream. 
Here are the recipes with pictures.


Pastry Cream

Ingredients:
6 large egg yolks
¾ cup (170 gr.)  sugar
1/3 cup (75.6 grams)cornstarch
2 cup (480 ml)milk
½ vanilla bean


Procedure:
Split the vanilla bean lengthwise and add to the milk.
Heat the milk gently to scalding.
Remove the vanilla bean and scrape the seeds into the milk mixture using a knife or small metal spatula.
Stir the egg yolks with the sugar and cornstarch.
Add the milk, a few drops at first to temper and then the rest.
Return the mixture to the heat (medium) and cook, stirring continuously with a wire whip until the
mixture bubbles for about 10 seconds.
Strain into another container through a fine mesh strainer. I like to use a ladle to swirl around the strainer to push the pastry cream though easily.
Cover with plastic wrap flush against the pastry cream and chill.


Devils Food Cake:                                                   (Sorry I do not have the conversions) 

Ingredients:
2 Cups  All-purpose Flour
3/4 Teaspoon Baking Powder
1 1/2 Teaspoons Baking Soda
3/4 Teaspoon  Salt
12 Tablespoons Unsalted Butter, room temperature
2 Cups  Sugar
3/4 Cup Cocoa Powder, non alkalized
2 Teaspoons Vanilla Extract
3 Large Eggs
1 1/4 Cups Water
1/4 Cup Milk

Procedure:
Preheat oven to 350 degrees. Grease 9 -inch spring form pan and line the bottom with parchment paper. Cover the outside of the pan with aluminium foil to catch any seepage.
2. Sift together the flour, baking soda, baking powder and salt. Set aside,
3. In a mixer fitted with the paddle, cream butter adding sugar slowly continuing to beat  for about 4 minutes. Turn off mixer and scrape down sides.
4. Add the cocoa powder and the vanilla and beat at low speed until smooth.
5. Add the eggs one at a time beating well in between on medium speed and scraping the sides constantly.
6. Combine the milk and water in a saucepan and bring just to a boil. 
7. Add the flour a 1/4 cup at a time on low speed. Add hot milk mixture slowly in a stream alternately with the flour beginning and ending with the flour and mix until smooth.
8.Bake for about 40 to 45 minutes or until toothpick comes out clean. Cool on a rack for about 10 minutes, remove outside ring and cool to room temperature.


Prinsesstårta Assembly

 I am including a diagram that Korena gave us. It is very helpful in assembly. 


Ingredients
2 cups (480 ml) heavy cream, chilled
granulated white sugar, to taste used 2 tablespoons because the devils food cake is not super sweet
 Cake, cooled
1/3 cup (80 ml) seedless raspberry jam 
Vanilla Custard, chilled
Covering and Rose

Directions:
1. In a large bowl, whip the heavy cream until soft peaks form. Add sugar to taste and continue whipping the cream until stiff. You want it to be sturdy enough to provide structure to the cake, but not over-whipped enough to make butter. Set the whipped cream aside.
2. With a long serrated knife, slice the sponge cake into three even layers. I used a cake leveler that I got from Wilton as shown in picture. Set aside the middle layer – this will become the top layer of the assembled cake as it is the most flexible and therefore easiest to bend into a dome over the whipped cream.


3. Place one of remaining layers on a cake board or serving platter and spread it evenly with the raspberry jam. Spread or pipe one  cup of the chilled custard over the jam in an even layer, leaving enough room around the edges so that it doesn’t spill over the sides of the cake.
4. Top the custard with another layer of cake. Spread with one cup of the custard evenly over it, again leaving some room around the edges.


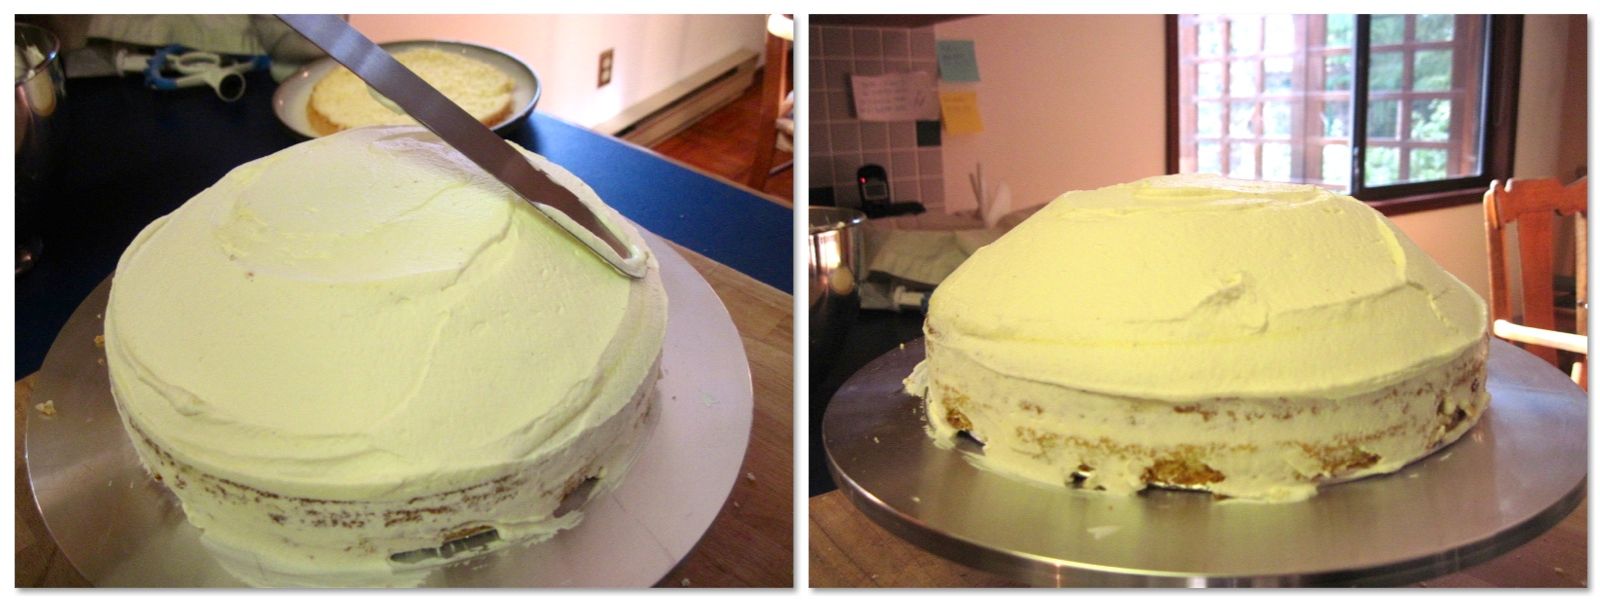
5. Reserve ½ cup (120 ml) of the stiffly whipped cream. Pile the rest into a mound on top of the custard. Spread it into a thick layer with a thin, flexible spatula or off-set spatula, then hold the spatula at an angle to shape the whipped cream into a dome, piling it up in the middle of the cake as much as possible.
6. Place the final layer of sponge cake (the one cut from the middle of the cake) on top of the whipped cream. Do not press on the top of the cake – instead, gently tuck the edges of the cake layer into the whipped cream, so that they are flush with the cream. This will create a smooth, seamless dome on top of the cake.
7. Gently spread the reserved ½ cup (120 ml) of whipped cream over the entire cake to fill in any cracks and even out the surface. If necessary, refrigerate the cake to firm it up before continuing.
 I got very nervous at this point as the cake was wobbly form all the creamy parts and I chilled it, rolled out the fondant and covered it without taking a picture. I am showing Korena's wonderful picture here so you can see what it should look like at this point.
Korena's beautiful cake covered with domed whipped cream

8. Dust your work surface with icing (confectioners) sugar and press the marzipan or other covering into a 6-inch (15 cm) disc (knead it a bit to warm it up first). Coat both sides with icing sugar and roll it out into a 14” (35½ cm) diameter circle less than 1/8” (3 mm) thick. Use plenty of icing sugar to prevent it from sticking. Alternatively, you can roll the marzipan out between two wide sheets of parchment paper (still use plenty of icing sugar).
9. Use the rolling pin to drape the rolled-out marzipan sheet over the cake and smooth it around the cake gently with your hands.
If it seems like it wants to fold or buckle around the cake, gently lift and stretch it away from the cake with one hand while smoothing it down with the other.
Trim the excess from the bottom of the cake with a paring knife or spatula blade.


These were great instructions from Korena and can be used for modeling chocolate or fondant.


I decorated the top of the cake with a rose and leaves done in modeling chocolate. I covered the bottom with a border of green modeling chocolate and used a modeling tool to press a pretty design.
I will post a tutorial about the rose  in my next post!
The rose is a traditional garnish and looks very pretty.
Thanks Korena! This challenge was a lot of fun and deeelish!

My slice !! And now off to the gym for some calorie burning!!


Thursday, May 9, 2013

Mothers Day Bouquet


I recently did a demo in the craft store where I teach cake decorating. I wanted to use the skills that a beginner would use and create something that was a little different than the usual 8-inch cake.
I came across this video that fit the criteria. There are a number of cupcake bouquet videos  on YouTube but this one was fun and very easy.

Click here for the video

I got the 6-inch pot and 4-inch Styrofoam from the store. The demo generated a lot of interest and quite a few remarks of how easy it looked. It is easy...and plenty of time to crank this out for Mom.

Give it a try. For all you moms out there, I hope you have a wonderful day Sunday!

Wednesday, February 27, 2013

February 2013 Daring Bakers Challenge - Crispy Flatbread


Sarah from All Our Fingers in the Pie was our February 2013 Daring Bakers’ host and she challenges
us to use our creativity in making our own Crisp Flatbreads and Crackers!

This challenge was right up my alley. I wanted a quick and easy challenge that I could go to the pantry and find all the ingredients that I needed. I chose the Raincoast Crisps from the several recipes that Sarah provided and I was not disappointed. The recipe was easy to prepare.  I halved the recipe because 8 dozen sounded like a lot of crisps. I varied some of the ingredients and put those variations in blue parentheses next to Sarah's original version.  I used a wonderful honey from my friend, Dave, at Paradox Farm.


The crisps were not quite a cracker although they were crisp and not quite a bread although they had a little chew to them. They were quite a hit with the family! Some of the family smeared them with peanut butter, some topped with a little cheese slice but I adorned mine with a glass of red wine :).
 We went on vacation to the Florida Keys and I took all the leftover(the recipe made a lot)  crisps with us for snacking en route. I had a few left when we arrived and finished them off in the backyard garden of our rented villa with that glass of wine... a great way to start a vaction.

Here is the recipe. The crisps are a tasty and nutritious treat. I think you will like them.


Raincoast Crisps
From Dinner with Julie blog with Julie van Rosendahl
Servings: About 8 dozen
Ingredients
2 cups (480 ml) (280 gm) (10 oz) all-purpose (plain) flour
2 teaspoons (10 ml) (10 gm) (1/3 oz) baking soda
1/2 teaspoon (2½ ml) (3 gm) salt
2 cups (480 ml) buttermilk
1/4 cup (60 ml) (50 gm) (1¾ oz) brown sugar, firmly
packed
1/4 cup (60 ml) honey
1 cup (240 ml) (180 gm) (6½ oz) raisins
1/2 cup (120 ml) (60 gm) (2 oz) chopped pecans (walnuts)
1/2 cup (120 ml) (125 gm) (4½ oz) roasted pumpkin seeds (chopped dates)
1/4 cup (60 ml) (30 gm) (1 oz) sesame seeds
1/4 cup (60 ml) (30 gm) (1 oz) flax seed, ground ( I did not use this)
1 tablespoon (15 ml) (2 gm) finely chopped fresh rosemary  (roasted sunflower seeds)


 Directions
Preheat oven to moderate 350°F/180°C/gas mark 4.
In a large bowl, stir together the flour, baking soda and salt. Add the buttermilk, brown sugar and
honey and stir a few strokes. Add the raisins, pecans, pumpkin seeds, sesame seeds, flax seed and
rosemary and stir just until blended.
Pour the batter into two 8”x4” (20cmx10cm) loaf pans that have been sprayed with nonstick spray.
Bake for about 45 minutes, until golden and springy to the touch. Remove from the pans and cool on
a wire rack.
The cooler the bread, the easier it is to slice really thin. You can leave it until the next day or pop it in
the freezer. Slice the loaves as thin as you can and place the slices in a single layer on an ungreased
cookie sheet. Slice so thin that they are almost lacy. Reduce the oven heat to slow 300°F/150°C/gas
mark 2 and bake them for about 15 minutes, then flip them over and bake for another 10 minutes,
until crisp and deep golden. You can also cut in half before the second baking. This is the way I like
them. The size works better. Be careful not to burn.
Storage and Freezing Instructions/Tips: Store in an airtight container at room temperature for up to 1
month. Prolong the freshness by freezing for up to 3 months.

Duck Key, Florida


Thursday, December 27, 2012

Daring Bakers' December Challenge - Panettone


The December 2012 Daring Bakers’ challenge was hosted by the talented Marcellina of Marcellina in
Cucina.  Marcellina challenged us to create our own custom Panettone, a traditional Italian holiday bread!

The challenge this month was a joy to do. I had never tasted Panettone before. I have seen it in the windows of Italian bakeries at the holiday time of year but never had the courage to try it. I am not a fan of candied fruit and there are so many other tempting treats to divert my attention.
When this challenge appeared, I resolved to make my own candied fruit. I knew it would be an extra step in what appeared to be already many, many steps, but I wanted to really get into this challenge.

I made the candied fruit from kumquats, navel oranges and Meyer lemons. I sliced the peel from the Meyer lemons and the oranges. I sliced and seeded the kumquats. Then I blanched the fruits three times to help remove any bitterness. I made a sugar syrup with equal amounts of sugar and water, simmering it about 10 minutes before adding the fruit.  I continued to simmer  for about 20 minutes. I drained the fruit through a strainer and spread the fruit on a rack, leaving it to set for about two days. Whew! I know, it was a labor of love for sure. But I grew to love candied kumquats and must admit to a bit of snacking during this slow progression.

The peel

Blanch three times
Cook in sugar syrup

I used the homemade candied fruits along with sultanas for the fruit. One bit of advice: Use a sharp knife to chop the candied fruits...the food processor is not up to the job.

Not working :(

Working :)


click on  RECIPE   for the Panettone.   Marcellina  has given a really wonderful recipe that turns out a beautiful bread. One slight variation I made was an Espresso glaze for the topping. I added it after the Panettone had cooked and cooled.  It gave the Panettone a nice richness.

Otherwise I followed  Marcellina's recipe to the letter. She did a great job of testing for us and you can rely on her instructions.

Friendly dough

Since it has turned downright cold here in New England, I allowed the dough to rise a little longer, and used my heating vent for some added boosting. I would like to give a shout out to my sweetest Lab, Pebbles, for not helping herself to the dough that was well within her grasp.


I am a good girl here in chilly Boston.
I found some really nice PANETTONE PAPERS. They were so perfect because I could bake and serve in the same container. I am not sure I will be making Panettone a lot and did not want to buy a pan so these disposable containers were the logical answer.


The final test was my dear friend, Karen, who knows Panettone and gave it a big thumbs up. Hooray!

Happy Holidays to all of you!


Saturday, October 27, 2012

October 2012 Daring Bakers Challenge - Puff Pastry


Well, I have been living a lie.
For many years, I have been buying  puff pastry instead of making it myself with the excuse that the frozen version actually tasted better than my homemade. I have never been good at the laminated (layered) dough. They always turned out a little tough.
But this month's challenge has changed my mind. I am never going back to frozen again.

Our October 2012 Daring Bakers’ challenge was hosted by Suz of Serenely Full. Suz challenged us to not only tackle buttery and flaky puff pastry, but then take it step further and create a sinfully delicious Mille Feuille dessert with it!

I had a rough start because I tried to make the puff pastry on an afternoon when I was really tired, I was not in tune with the dough and as silly as it may sound, I firmly believe that you have to be empathetic to your dough to understand what it needs for success.
Here is a picture of the puff pastry failure. Note the oozing butter through the dough. That is not a good thing.

BUT it got better from there. I started on an afternoon when I was not tired and had no other real pressing tasks.
I decided early on in the month that I wanted to make a Caramel Apple Napoleon. It is Autumn here in New England and the apples are everywhere. The days are getting shorter in daylight time but the temperature is still mild. I wanted to make something homey but still light.

Here is the recipe for Puff Pastry as Suz wrote it. It is a great recipe if you follow her suggestions:

Puff Pastry:
Servings: Makes 8-10 mille-feuille (yields: 675g pastry)
Ingredients
1¾ cup (250g) plain/all-purpose flour
Scant ¼ cup (55 ml) (1¾ oz)(50g) unsalted butter, chilled and cubed
1 teaspoon (5ml) (6 gm) salt
½ cup plus 2 tablespoons (5/8 cup)(150 ml) cold water
14 tablespoons (210 ml) (7 oz) (200g) butter (for the beurrage), room temperature
3½ tablespoons (55ml) (30g) plain flour (for the beurrage)
Additional flour for rolling/turning
Directions:
1. Cut the larger quantity of butter into smallish pieces and set aside at room temperature.
2. Put the larger quantity of flour into a bowl with the salt and the cold, cubed butter.
3. Lightly rub the butter and flour between your fingertips until it forms a mealy breadcrumb texture.
4.Add the cold water and bring together with a fork or spoon until the mixture starts to cohere and come away from the sides of the bowl.
5. As the dough begins to come together, you can use your hands to start kneading and incorporating all the remaining loose bits. If the dough’s a little dry, you can add a touch more water.
6. Knead for three minutes on a floured surface until the dough is smooth.
7. Wrap in clingfilm and refrigerate for at least 30 minutes.


8. While the dough is chilling, take your room temperature butter and mix with the smaller amount of plain flour until it forms a paste.
9. Place the butter paste between two sheets of clingfilm, and either with a rolling pin or your hands (I found hands easiest) shape it into a 4.5”/12cm square. You can use a ruler (or similar) to neaten the edges.

10. Refrigerate for about 10-15 minutes so the butter firms up slightly. If it’s still soft, leave it a bit longer. If it’s too hard and inflexible, leave it out to soften a touch. You want it to be solid but still malleable.
11. Once the dough has chilled, roll it out on a floured surface into a 6”/15cm square. Place the square of butter in the middle, with each corner touching the centre of the square’s sides.
12. Fold each corner of dough over the butter so they meet the centre (you might have to stretch them a little) and it resembles an envelope, and seal up the edges with your fingers. You’ll be left with a little square parcel.
13. Turn the dough parcel over and tap the length of it with your rolling pan to flatten it slightly.
14. Keeping the work surface well floured, roll the dough carefully into a rectangle ¼ inch /6 mm in thickness.
15. With the longest side facing you, fold one third (on the right) inwards, so it’s covering the middle section, and ensure that it is lined up .
16.Then, fold the remaining flap of dough (on the left) inwards, so you’re left with a narrow three-layered strip.
17. Repeat steps 14, 15, 16.
18. Wrap up in clingfilm and chill for at least 30 minutes.
19. Repeat steps 14, 15, 16 twice.
20. Wrap up in clingfilm and chill again for at least 30 minutes.
21. Repeat steps 14, 15, 16 two final times.
22. Wrap in clingfilm and chill 30 minutes or until ready to use.

I made a Caramel Pastry Cream that was a little complicated but turned out delicious. 
3/4 cup (6 oz,177ml)sugar
1/3 cup (80ml) water
1 1/3 cup (330ml)milk
2 large egg yolks
2 TBSP (1/2 oz, 14 gm) cornstarch
3/4 cup (6 oz,177ml)  heavy/whipping cream 

Preparation:
In a saucepan over medium-high heat, tilt and stir sugar with water until melted then turn heat to high and cook until amber-colored, 8 to 10 minutes. Pour onto a sheet of foil (about 12 by 18 in.) and let cool to room temperature, about 20 minutes. Peel off foil and break caramel into chunks; put in a food processor or blender and whirl into a fine powder. Try to use right away as it will clump if not. If it clumps, just disolve it a bit with the milk and proceed.


  1. Combine milk and caramel powder in a 1 1/2- to 2-quart pan; stir over medium heat just until caramel is dissolved (it will form lumps, then melt; do not boil), 9 to 10 minutes.


  1. In a small bowl, beat egg yolks to blend. Add cornstarch and 
  2. whisk until smooth. Pour about 1/2 cup of the hot milk mixture into yolks and whisk until blended, then whisk yolk mixture into pan and stir over medium-high heat just until mixture boils and thickens, 3 to 4 minutes.
  3.  Rub pastry cream through a fine strainer set over a bowl; discard residue. Cover pastry cream and chill about 1 hour, or nest bowl in ice water and stir until cool, about 30 minutes.
I got this cool metal elevation tray at an Asian grocery store-perfect for colling things quickly.

  1.  In a large bowl, with a mixer on high speed, beat the whipping cream until it holds soft peaks. Gently stir the whipped cream into the cool pastry cream.

Mille-Feuille/ Napoleon/ Custard Slice
Servings: Makes 8- 10
Ingredients
1 x batch pâte feuilletée/puff pastry (see above)
1 x batch creme patissiere/pastry cream (see above)
2 ¾ cups (660 ml) (12⅓oz) (350gm) icing sugar
2 teaspoons (10 ml) lemon juice
1 TBSP Meringue Powder( dried egg whites)
½ cup (2¾ oz) (80gm) caramel sauce

Directions:
1. Preheat oven to moderately hot 200 °C /400°F/gas mark 6.
2. Lightly dust your work space with flour and remove your dough from the fridge.
3. Roll into a large rectangle, the thickness of cardboard. The recipe I followed specified no other dimensions, but I rolled mine to about 12”/30cm x 18”/46cm.
4. Cut into three equal pieces and place on a baking tray. If you don’t have space for all three, you can bake them separately.
5. Prick the pastry sheets all over with a fork.
6. Place another sheet of greaseproof paper over the top and then a heavy baking tray. This will prevent the layers from puffing up too much. I also used a Pyrex dish to add more weight.
7. Bake each sheet for about 25 minutes in a moderately hot oven 200 °C /400°F/gas mark 6, removing the top layer of greaseproof paper/tray 10 minutes before the end for the tops to brown. Keep an eye on them periodically and lower the temperature if you think they’re browning too much.
8. Remove the baked sheets from the oven and leave on a wire rack to cool.
9. Once the pastry has cooled, you’re ready to assemble your mille-feuille. Get a sturdy flat board, your pastry and the chilled crème patissiere from the fridge.
10. Lay one sheet on the board and spread half the crème patisserie evenly over the top.
11. Take the second sheet and place it on top, pressing down lightly with your hands to ensure that it sticks to the filling.
12. Spread the remaining crème patisseries and place the last sheet of pastry on top, pressing down again. (Don’t worry if there’s some oozing at the sides. That can be neatened later.)
13. Pop in the fridge while you prepare the icing /caramel sauce.
14. Make a caramel with 1/2 cup sugar and 1/4 cup water, add 1/2 cup heavy cream to the caramel and cook over low heat to melt the caramel and thicken sauce.


15. To make the icing,  Whisk  about (2 cups) 300gm of the icing sugar on a low setting with the meringue powder and about 1/4 cup water until smooth and combined,, adding more water if necessary to achieve a thick pourable consistency The mixture should be thick enough to leave trails on the surface. If it’s too thin, whisk in a bit more icing sugar.


17. Once ready, immediately pour over the top of the mille-feuille and spread evenly. I found that I didn’t quite need all of the icing.


18. Still working quickly, pipe a row of caramel sauce along the widest length of your pastry sheet  You can make them as far apart/close together as you like.


19. STILL working quickly (phew), take a sharp knife and lightly draw it down (from top to bottom) through the rows of chocolate. A centimeter (½ inch) or so further across, draw the knife up the way this time, from bottom to top. Move along, draw it down again. Then up. And so on, moving along the rows of caramel until the top is covered in a pretty swirly pattern.

20. Once you’ve decorated your mille-feuille, with a sharp knife, trim the edges and cut your slices.


Constructing the dessert was not complicated but time consuming and I was impatient. It is not a pristine version of a  Napoleon but it was really yummy.
And I had leftover pastry! So, I cut it into strips, wrapped it around some jalapeno stuffed olives and baked them for about 20 minutes in a 425 degree oven.


They were so good with that ice cold beer that I ruined my appetite for dinner. Thank goodness I got it back for dessert.